Showing posts with label cake. Show all posts

Saturday, December 11, 2010

How To Make an (Instant) Barbie Cake

On Ameera's birthday, I had planned to make her Barbie-themed cake. The thing about living in Ireland is, I don't have that much choice to buy the tools or any other fancy baking stuff that you can easily find back home in Malaysia. Even if there I find a few, they normally turn out to be just so expensive and not worth it because I won't be using it that often. In this case, I didn't have those a big round baking pan to use as mould for Barbie's skirt.

Fortunately nowadays, there are lots of tips and new ideas on the internet.  I came across Betty Crocker's site which gives you different ideas for making kids' birthday cakes more interesting, from scratch without having to use special tools or moulds.

For example for my daughter's Barbie cake...

Si Barbie yang Katek

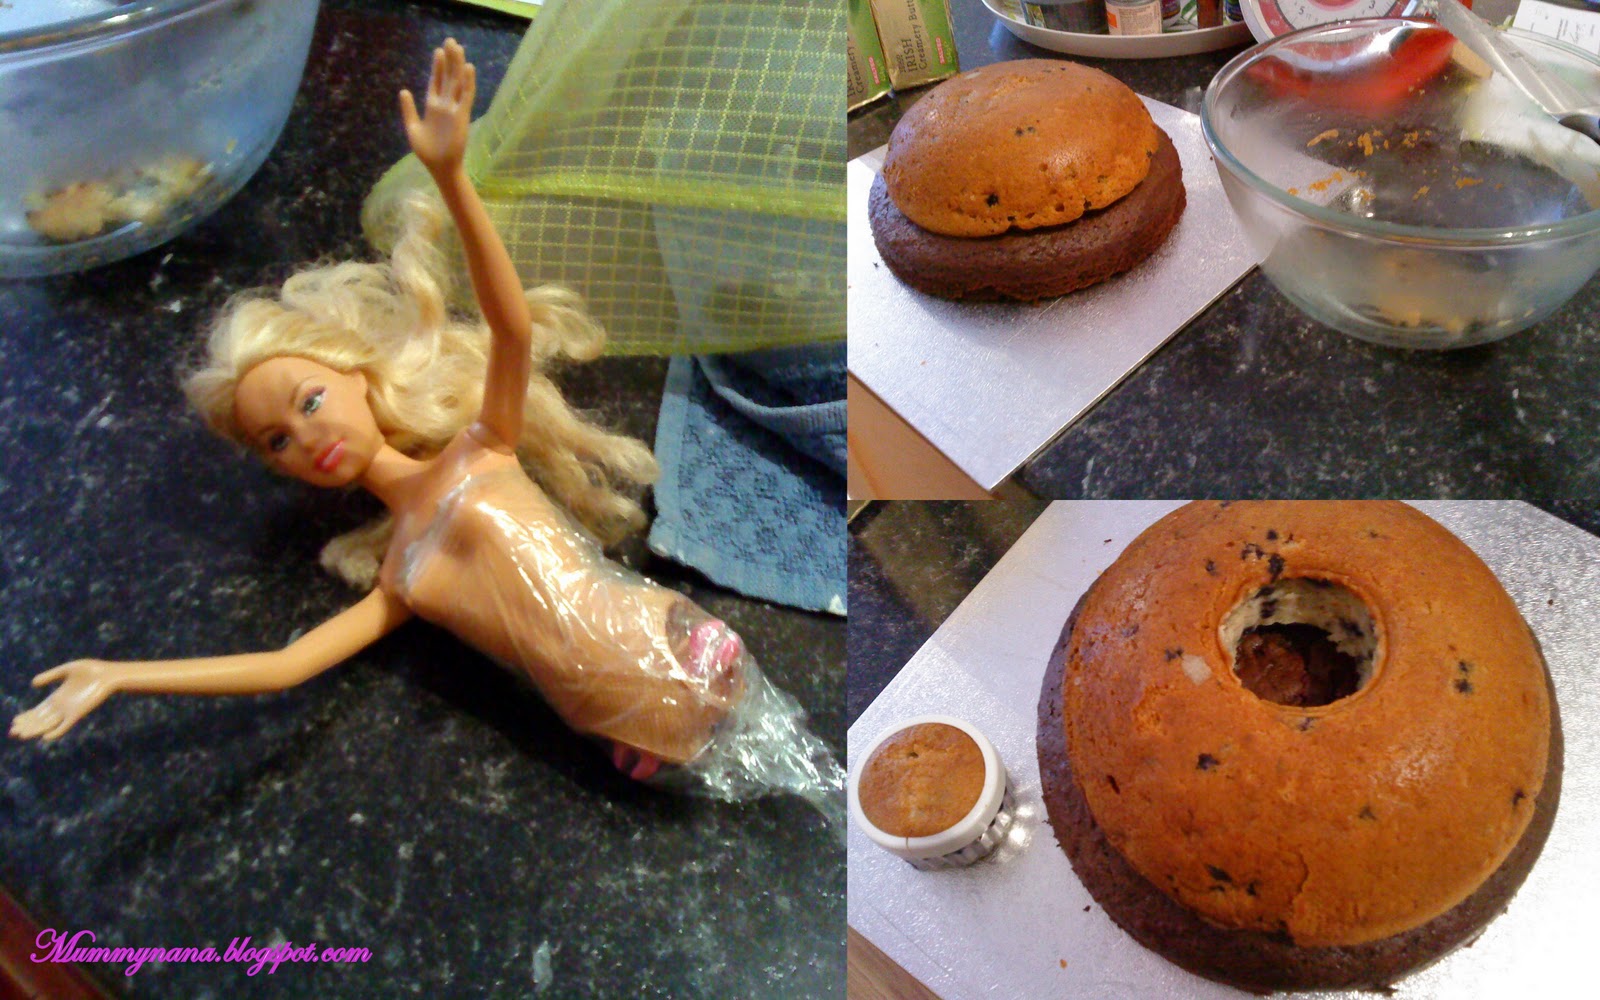
Of course, as a start, you need a Barbie doll Next, I'm sure you guys have a glass bowl (an oven-proof because we'll be baking in it) for the top part and a normal baking pan for the bottom. Maybe you'll need more than 1 baking pan. A different size for the bottom if you want to make the skirt longer. Unfortunately, I was too lazy so I just used one and that's why I have to break the Barbie princess' legs. Ahaks! My daughter screamed when she saw it. Sacrificial Barbie. Hehehe...


Eh OK, maybe you could just watch this for yourself...


This is the inside of what my cake looks like. I made a blueberry muffin cake for the top and chocolate cake for the bottom. Don't think they go to well but like I said, I was running out of ideas and was just plain lazy!


There are so many other options and ideas from HowdiniGuru including the Dinosaur cake for Husayn's birthday last month. You'll be surprised yourself and it's very easy.  Happy baking.

To the Barbie lovers out there: Ameera's old Barbie doll went through re-constructive surgery and is now her normal cheerful self again, two legs and all!

Saturday, June 19, 2010

Nana-rella Cheese Cake Pops

Oh yeah, at this recession time of what else can you do to save money and make do with what you have AND at the same time, feel that you have the same things that other people have. Well, this applies to me especially when it comes to fancy shamnsy cakes. If I had the money, I'd just buy them all. Simple and no hassle whatsoever.

But, as I don't have that sort of money (not for fancy cakes and extras anyway), I've decided to go DIY for all the extra bits. The results weren't too bad (I think) as you can see from the spread at Hisham's birthday party.


Ever since I started to blog, I've always been blog-hopping (using Blogger's Next Blog function). Not surprisingly, I tend to come across the Bakerella website very often. I've also definitely seen links from lots of other bloggers about how cute, tempting and yummylicious the sweets things made by Bakerella for all occassions.

Naturally, I've always imagined to have some of these yummylicious stuff at my son's first birthday party. So, with no test attempt or trials confidently, the day before the big day I tried this nice cute Bakerella cake pops myself. I did everythig from scratch, even the cheese frosting. I also got the whole recipe with videos from Martha Stewart's site.

At one stage, I thought I had done something wrong. The frosting wasn't thick enough and the cake crumbs wouldn't make nice, compact round balls. After a few adjustments, I finally managed to get the right shape.

Mummy Nana's tip: If doing from scratch, you might need to put less butter or maybe no butter at all for the frosting. Or to be safe,  I think for the next time I'll just buy the ready made frosting as I think it's cheaper rather than to make it yourself!


You won't believe that these ugly looking balls can turn out to be quite nice!
 

Candy coating - ordered online

Giving my sister a chance to model my stuff here

So, here are the results. TADA!!!!!!!!!!!!!!!!!!!!!!!! Oh I am so happy. With no proper tools like flower-shaped cutters and having wasted a few of the wilton red candy coating (because  I wasn't sure on how to melt it properly. NB: Don't over heat it!) I still managed to finished it, eventually. Everybody was so impressed and loved it.

Favourite Q for the day: Eh kat mana beli lolipop kek ni? Kat mana order cheeseball ni?

I just smiled and bangga kejap. Akak buat sendiri dek Nun.... heheheh...

 The last one

Thanks  to Bakerella for the idea.

Monday, February 1, 2010

Double Trouble Oreo Cheesecake

Picture courtesy of Adik Darina

My infamous Double Trouble Oreo Cheesecake. I don't really like unbaked cheesecakes. But one day, I tasted an unbaked Oreo cheesecake. I'm not sure where the recipe came from, but some one told me it could be from Nigella Lawson. I searched on her website but couldn't find the one that I was looking for.

Eventually, I gave up on finding Nigella's recipe and decided to give it a try on my own but with a twist: a combination of unbaked AND baked cheesecake in one! Double Trouble.

My theory is, to make a cheesecake, you just need a basic recipe and try to create your own from there.So, I came out with this
double-layered Oreo cheesecake as an experiment and coincidentally, the day I made the cake, a few of my friends came along and tasted it. Since then, they've been telling everyone how amazing the cake was (OMG?!?).

I was so embarassed since it was just an experiment and when they asked me for the recipe, I wasn't even sure what to say because I just threw together the ingredients that I felt was right along with whatever was in my fridge. I can't even be sure of the exact measurements.

So, after some time which invoved a constant barrage of questions, hints and outright demands about the
infamous cheesecake or my friend call it CCO, so unconfidently, I tried again to think what I should do and taa daa! I think I did it and this time with an added achievement. I managed to measure the ingredients so that I can share the recipe with my friends.

For base:
1 packet (154gm) of Oreo biscuits crushed finely (DON'T lick the white stuff off the cookies!)
3 Tbsp melted butter

First layer:
2 Pack (225gm) of PHILADELPHIA Cream Cheese
200ml of Sour cream
1 Pack (150gm) of white chocolate (optional)
4 Tbsp sugar
1Tbsp cornflour
3 small eggs
4 Pieces of Oreo cookies broken into small pieces

Second layer:
1 Pack
of PHILADELPHIA Cream Cheese
100ml of Double cream/Fresh cream
2 Tbsp icing sugar
8 Pieces of Oreo Cookies crushed finely

Method:
For Base
Heat the oven to 170 degrees. While the oven heats up, MIX Oreo cookie crumbs and butter. Then, press onto bottom of a 7-inch springform pan. Leave aside.

First Layer
Double-boil the cream cheese and white chocolate.
Beat all other ingredients really well. Mix in melted cream cheese and white chocolate and beat again on lower speed. Pour over the Base prepared above. Sprinkle evenly the broken Oreo cookies in the batter. Bake in a water bath for 30-40 minutes i.e. until a knife you insert into the cake comes out clean. Leave it to cool.

Second Layer
Beat icing sugar and cream until thickend or if you turn the bowl the mixture won't drop. Mix in the cream chesee until
mixed well. Fold in 2 tablespoons of finely crushed (crumbs) Oreo cookies into the mixture. Spread evenly onto the baked cool First Layer prepared above. Lastly, sprinkle the remaining Oreo cookie crumbs onto it. Make sure it's well covered.

Leave in the fridge for about an hour or over night before serving.

Picture courtesy of Adik Darina

I even made it into cuppies today!


Note: If you using a 9-inch springfoam pan you could double the ingredients. Make sure when you pour in the first layer, the batter is in between half to 3/4 of the pan so that you can leave the remaining space for the second layer. Don't worry if you have too much batter. You can always turn them into cupcakes for some mini delights!
Related Posts Plugin for WordPress, Blogger...